Tag Archives: real food

My Second Trimester

Welcome to the second instalment of my personal experiences during my pregnancy. If you haven’t read the first part (and if you want to!) check it out here.

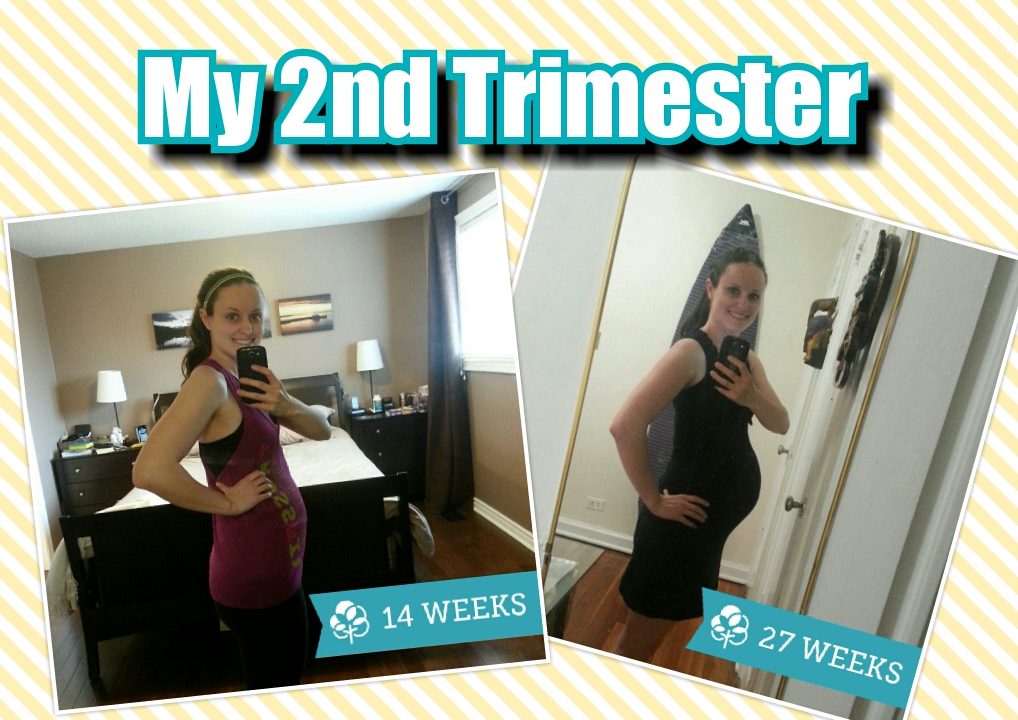
My second trimester was a lot less eventful. I got through the minor symptoms that I was experiencing in my first trimester – namely pretty serious fatigue, and occasional nausea popping up if I wasn’t on point with my food. As most other women say, the second trimester was the smoothest and I felt most like myself! By 16 weeks I didn’t even feel pregnant anymore – except for my slight baby bump!

Major Trends / Lessons Learned in my 2nd Trimester

Nutrients – still my major focus. Lots of collagen (smoothies, jello), bone broth, salmon, veggies, liver, egg yolks and ferments (like kombucha and sauerkraut).

Major Appetite in the Morning – I used to get up, have a coffee and go to the gym. In my first trimester, I ate a banana pre-crossfit, but that was no longer sufficient as of 14 weeks. I needed something quick, mostly carbs with some protein, that I could easily eat before the gym. So I stalked up on some clean sandwich meat (duBreton ham) and a clean gluten-free bread (from Cup of Tea Bakery), and I started having a ham-sandwich (and sometimes a banana too!) before the gym in the morning. While this isn’t the most nutrient dense snack, my body tolerates it really well, it allows me to exercise first thing, and it wasn’t actually replacing another nutrient-dense meal. This snack is in addition to my 3 nutrient-dense meals.

Staying Hydrated – The one thing I desperately crave is water, and it can come on out of nowhere. So I never leave the house without a large bottle of water. With summer approaching and the temperature starting to creep up, I felt like I was drinking tons of water, but not actually absorbing any. So I started adding lemon and a pinch of sea salt, to add electrolytes and enhance absorption. I also started drinking mineral water with lime occasionally. I also just decided to go with it and drink lots of water when I needed it!

Longer Breaks between Meals – by 16 weeks I felt back to myself, and was able to go back to my standard 4-6 hours between meals. As long as I had that early morning snack, 3 squares for the rest of the day worked great. This started to change as I approached my 3rd trimester and my stomach volume started to shrink (see end of post)!

Blood Glucose Testing – because my diet is quite dialled in (I pretty much eat the way I recommend to diabetics), and I haven’t been indulging in junk during this pregnancy, I know my body will not respond well to the glucose load they give you. Not to mention the fact that it’s corn syrup + orange food dye – both of which I avoid like the plague. So I chose to opt out of the standard blood sugar testing, with total support from my midwives and my family doctor. That being said, I was not irresponsible and stopped thinking about it altogether. I did 2 things instead (1) I did a blood test for my HbA1C, a really good indicator of how your body handles your glucose load and (2) around the 26 week mark, I checked my blood sugars using a finger prick test (available at your pharmacy) a few times. What’s right for you? Well that’s for you to decide with your health care provider. However, you do have options. If your diet isn’t optimal for managing blood sugar (high in grains, flour-based foods, sugar etc. or needing to eat every 2-3 hours) or if you have a risk for gestational diabetes, you definitely want to make sure your blood sugars are in check. You can usually do a typical blood glucose test with your doc, but ask for a cleaner sugar-load (like dates, bananas or even honey) so see if your doc will go with that. Alternatively, finger-prick tests are a great option!

Increased Appetite Overall – this is likely compounded by the fact that I workout 3-4 days/week still. So when I feel the need to eat more, I do. I just keep it real, whole foods. Most of the 2nd trimester I just ate more at each meal – I was often eating more than my husband! 

Gaining Weight – I did not worry whatsoever about gaining weight. My number one goal was to make sure I was providing my body with enough nutrients to allow a new human to be built (holy jeez that’s a crazy thought, still!) but also with enough fuel to support the energy demands of both building a baby, but also living an active life and crossfitting 3-4x/week. Interestingly, I didn’t gain a pound until after 20 weeks, even though I was consuming more than my 6’4″ husband!! I listened to my body and when I was hungry, I ate. I just made it (mostly) real, whole foods.

Crossfit – The beginning of my 2nd trimester I was still rocking along. I did the crossfit open (and got my first chest to bar pull ups!) at 12 weeks pregnant, and even PRd some lifts! The one thing I always did was keep my breath rate in check, cause if I was panting, baby wasn’t getting oxygen. This was hard at the beginning because I felt like myself, but knew I needed to keep my intensity level down – particularly challenging for a competitive individual like myself! Luckily, as my belly started to grow, it became much easier to handle 🙂 By about 22 weeks I was no longer able to do olympic lifting, and while many pregnant women continue doing snatches and cleans with a belly, it seemed very counterintuitive to me. The whole focus of olympic lifting is to keep the bar as close to your torso as possible, which takes so much practice. To change form for a few months, and have the bar go out and around the belly, not only increases risk of injury, but undoes all of the hard work I’ve put in so far. So instead, I switched to dumbbell cleans/snatches, KB swings, or technique work on parts of the lifts (like pulls, jerks or snatch balances). Outside of that, I didn’t have to change too much!

Heat Tolerance – well this was shocking. I used to be able to work out in 35 degree weather, no problem. But now, sitting outside in the shade for 15+ minutes in that kinda heat left me seriously nauseated. I’m having to be really careful about staying cool.

Energy Levels Overall – as of 26 weeks I started experiencing shortness of breath (which makes sense if you know what happens to your internal organs during pregnancy). I’m also quite a bit bigger so moving a little slower. As always, I’m listening to my body and resting when I need to – even if that means taking a nap when there’s something else I need/want to be doing, skipping a work out (which I don’t love doing) or opting out of social events that I know will be draining. 


Transition to 3rd Trimester (26 weeks on…)

My stomach volume clearly started shrinking around 25/26 weeks (check out this video to see what happens to your internal organs during pregnancy!) and it is definitely impacting how I have to eat. I can no longer eat a large meal, and cruise on that for 4-6 hours (which is what I recommend in my practice – best for blood sugar regulation, gut health, being able to use both carbs and fat as fuel, and preventing “hanger”). Due to my uterus/baby squishing my stomach, eating a large meal results in serious discomfort – not reflux, but tons of pressure. Clearly there’s no room! So I’m now onto 3 small meals + 2-3 larger snacks throughout the day. For example:

Pre-workout: ham sandwich (2 slices clean ham + 2 pieces GF bread)

Breakfast: 2 eggs + greens + ½ cup potatoes OR green mango smoothie 

Lunch: leftovers (usually 3-4oz meat, veggies, starch) OR eggs (if smoothie for breakfast) OR can of fish + salad + ½ bag plantain chips

Snack: small smoothie (blueberries, cherries, water, collagen) OR apple + organic PB OR banana muffin with coconut oil/ghee OR liver pate + apple slices OR plain, full-fat goat yogurt + collagen + blueberries

Dinner: 3 oz meat or fish + veggies + starch (fried plantains, white rice cooked in bone broth, potatoes, sweet potatoes or sweet potato noodles)

Snack: fruit OR banana muffin OR organic cherries with coconut milk OR ½ ham sandwich

Orange Jello

Orange Jello | DIY, dye-free, sugar-free | real food, paleo, AIP | AmandaNaturally.comIt was 35 degrees here on the weekend (for my friends south of the border, that’s 95F) and while that’s just gorgeous for most people, being 6 months pregnant made it a little tough to handle! So I spent the weekend enjoying lots of cold food like salads, hard boiled eggs, smoothies and JELLO!! 

Why jello? Two main reasons.

  1. I’m obsessed with cold fruit, and jello is a fun way to add variety. But more importantly…
  2. Gelatin. I’ve gone on and on about the health benefits of gelatin – you can find them in my blog posts on bone broth, healing leaky gut, watermelon jello and chocolate smoothies. Pretty much it’s amazing for gut and joint health, but also anywhere that there’s connective tissue – including skin, nails and hair (bonus!). I’m especially obsessed with it right now, cause I’m building brand new connective tissue for my kiddo, so making sure I get in lots of building blocks during my pregnancy. Extra awesome about this recipe is the vitamin C content from the oranges – connective tissue also requires vitamin C to be created, so this is a double whammy!

Orange Jello

Tips

  1. Use real fruit, not juice. If you don’t want to juice oranges like I did, choose a different fruit and throw in your blender. I have a recipe for watermelon jello that does exactly that! Juice is barely better than pop, even the organic stuff found at health food stores. Keep it real folks.
  2.  As always, I prefer grassfed animal products. My go-to brand of gelatin is Vital Proteins Beef Gelatin (we actually important it from the US), and it is often available on Amazon.ca, but right now it is on serious back order. Great Lakes Brand is a solid alternative. Your standard grocery store gelatin would work just fine as well.
  3. Don’t use grocery store jello. The food dyes and corn syrup (or worse, artificial sweeteners) are pure toxins. It takes a few seconds to blend/juice some fruit and then it’s actually good for you!
Orange Jello
A healthy alternative to the store-bought junk! Dye-free, sugar-free, gut-healing and filled with vitamin C!
Write a review
Print
Prep Time
10 min
Cook Time
2 hr
Prep Time
10 min
Cook Time
2 hr
Ingredients
  1. 4 cups orange juice (I used 3lbs of oranges, which I juiced the old fashioned way. It resulted in 2.5 cups of juice, which I topped up with water to achieve 4 cups total liquid.)
  2. 4 tbsp gelatin (Vital Proteins is my favourite product, followed by Great Lakes Brand)
  3. maple syrup, to taste (optional, I didn't use any)
Instructions
  1. Juice your oranges and add water to achieve 4 cups. Taste and add maple syrup if necessary.
  2. Pour half (2 cups) into a small saucepan and heat over medium. Do not boil!
  3. Meanwhile, add 4 tbsp of gelatin to the remaining 2 cups of liquid in a bowl or measuring cup. Let bloom for about 5 minutes.
  4. Once the liquid in the saucepan is very warm (but not boiling), stir in the gelatin/liquid combo and remove from heat.
  5. Whisk to combine well. If necessary, use an immersion blender to blend completely.
  6. Pour into an 8x8 glass pan, silicon chocolate moulds or silicon ice cube trays.
  7. Refrigerate for 2+ hours.
Notes
  1. If you only end up with 3.5 cups of liquid, use 3.5 tbsp gelatin - just keep the ratio the same!
  2. Add other flavours like lemon, lime, or grapefruit
  3. If you like stuff in your jello, add some orange wedges or berries after pouring into moulds/pan
Amanda Naturally http://www.amandanaturally.com/

Detox Your Home

When you start down the path of more natural living and trying to detox your home, it can be a bit overwhelming as you realize how insidious toxins are. This can be especially scary for parents, or soon-to-be parents!

Note: as someone with a rigorous science degree, I’m careful of using the word “chemical” as a bad thing. Everything is made up of chemicals! So many scientific terms are misappropriated in common language. For the sake of this article, I am going to use the word “toxin” to describe chemicals that can be harmful to the body.

Pretty much everything we use is full of toxins – make up, perfume, dishwasher detergent, tile cleaner, carpet cleaner, air deodorizers, sunscreens, moisturizer, toothpaste, food containers, food, water… Like I said – overwhelming. I’m not going to get into what these toxins are and how they impact your body, because that’s a HUGE can of worms. Instead, I’m going to share my favourite products that I use on a daily basis, after years of trial and error! If you want to dig deeper, check out The Environmental Working Group, or read Slow Death by Rubber Duck.

I always recommend taking a slow, methodical approach to detoxing your house because it’s less over-whelming and less of a financial impact! So each time you finish a product, make a conscious effort to replace it with a cleaner one (either from the health food store/health section or make your own!) However, according to Gretchen Rubin what’s most important when making change is to know yourself. Are you the complete overhaul, 180 degree turn, all or nothing kind of person? Then go for it. Toss it all and replace accordingly! Once you figure out what works best for you, here are the main areas I recommend addressing.

1. Cleaning Products

Have you ever noticed how many different products you are told you need for your house? It’s all marketing friends. And marketing of some serious toxins. The majority of the ingredients in household cleaning products are hazardous – the warning is right there on the label. And the funny thing is, it’s totally not necessary! There are 3 amazing house-hold products that are just as effective at cleaning (both aesthetically and bacterially-speaking) as toxins, without any of the nasty side effects. These are:

Baking soda. Vinegar. Lemon.

There are a few additional ingredients that can be used too, such as borax, castille soap, washing soda and essential oils. But it really doesn’t have to be complicated. The cleaning products I use in my house are:

  1. Lemon vinegar cleaning solution (for the kitchen and greasy areas) – I also dilute this and put it in my reusable swiffer-type mop
  2. DIY bathroom cleaner

And that’s it…. honestly. Do you know how much money I’ve saved on products over the last 5 years or so? I wish I had the numbers, but it’s gotta be up there. I haven’t bought laundry detergent, or the ingredients to make it in over 18 months.

If you’re a little more particular and want some specific cleaning products for targeted areas (like hardwood, antiques etc.), check out One Good Thing by Jillee.

For clothing / hands / dishwashers, I use:

  1. DIY laundry detergent
  2. Dr. Bronner’s castille soap or The Soap Works bar soap (found at Bulk Barn).
  3. EcoVer dishwasher detergent 
  4. Nature Clean dish soap (I’m partial to the lavender and tea-tree oil)

And for natural deodorizers I use:

  1. Pure essential oils or an essential oil spray.
  2. Poo-pourri. (if you haven’t seen the commercial for this stuff, check it out now!)

But there are lots of clean options if you visit a health food store! Be skeptical though. Green-washing is a major thing these days since “going green” is super trendy. Check the ingredients and make sure there aren’t any wonky ones like parfum, parabens, or sodium lauryl sulphate.

TOP PRIORITY: the strongest smelling product in your arsenal, or the one that makes you a little woozy if you don’t open the windows. Bathroom cleaners and deodorizers (Febreeze, Glade plug ins etc.) are often the worst!

2. Personal Care

First and foremost – stop using perfume/cologne. It is purely synthetic and made of almost exclusively dangerous toxins. Over hundreds of toxic chemicals that the company is not required to disclose – it’s proprietary info. It’s the number one thing you can do to reduce your toxin exposure. Ok, now that that’s out of the way, here are my favourite products (sort of in order of use during the day):

  1. Shampoos & conditioners by Prairie Naturals. They have a variety of types based on hair-type. I personally use the avalanche line in the winter (helps with dry scalp) and the moroccan moon line the rest of the year. Some people have success with the no-poo method, but it didn’t work for me.
  2. Soap by The Soap Works. I use this for my hands and any parts of my body that need a good scrub – like my feet if I’ve been barefoot! But honestly, I usually just use a loofa and water in the shower.
  3. Toner – DIY. I dilute 1 part apple cider vinegar with 4 parts water and store in a little spritzer container in the shower. I use this on my face, neck, chest, shoulders and upper back. It tightens pores, but also helps mitigate blemishes. If my diet has been off a bit and I find some odour emanating from the armpit region, I’ll spray some on there too. I rinse off immediately after spraying!
  4. Moisturizer – argan oil or olive oil (as part of oil cleansing method, see below)
  5. Make up by Pure Anada. I love this brand. It’s Canadian and works so well. I used to buy it at The Big Carrot on the Danforth, but now order it online. It’s mineral make up, so it lasts me years. Other mineral-based make ups are great options as well. Just be careful not to inhale!
  6. Deodorant – DIY. I used to use my DIY deodorant, but a client of mine makes her own and it’s the best I’ve ever tried. I’m working on getting her to sell it!! Before I changed my diet, healed my gut and balanced my hormones, I was a major sweater. It was bad. I never wore t-shirts. Grey was a nightmare colour. Ugh, it was the worst. So this was the last thing I changed. For the longest time I used Tom’s anti-perspirant – which still had the aluminum for reducing sweating, but the rest of the ingredients were pretty darn clean. I still sweat a fair amount, but not anywhere near what I did before balancing my body! I even own a grey t-shirt! That I wear on not very hot days… 😉
  7. Perfume. I’ll be honest, I don’t use any. It was never really my style anyways, they always bothered me. However, I do sometimes use essential oils as perfume (especially blends designed for mood balancing like Peace & Calming if I’m going to an event which I know I’ll find overwhelming, or Valor if I need a confidence boost). Pacifica is an easy to find brand of perfume that is mostly essential oils.
  8. Face-cleansing / moisturizer. I follow the oil-cleansing method which I learned in The Purely Primal Skin Care Guide. It works wonders for my skin (after a few weeks of adjusting) and I can’t imagine going back. It took a little trial and error to determine the right oils (which is complicated by the fact that winter and summer have different requirements – always have for me), but it’s amazing. Another way I save a TON of money.
  9. Toothpaste – Earthpaste is my favourite (it does a great job whitening too), although we sometimes have Jason’s.

UPDATE: I am also including a variety of Beautycounter products as part of my regular routine. Click here to learn more.

TOP PRIORITY: anything that has the word “perfume” or “parfum”, followed by things that stay on your skin. So moisturizer is more important than shampoo.

3. Water

Drinking/ice/tea/kombucha etc. This was a very important area for us, since it is a major area of exposure and our water is full of SOOOO much junk. As soon as we bought house, we did some digging into the best water-filtration unit. We were willing to spend thousands on a whole-house system, but after doing some research (made easier by The Wellness Mama) we ended up going with a Berkey. At around $450, it was perfect for our soon to be growing family. Easy to use and gets rid of everything we don’t want, while also remineralizing. Bonus is it’s free-standing so when/if we move, we can take it with us. The best compliment we received was from a friend who said our water tasted like the water on his parents farm (in a very remote area!) – especially cool since the water that goes into the filter smells like a swimming pool. NOTE: previous to the Berkey, we used a Brita which has its downsides but is better than nothing. As soon as the water filtered through I dumped it into a glass juice jug so it wasn’t sitting in plastic all day.

Shower/bath – we also installed filters on our shower heads, and bought a bath ball. This is important because we actually absorb more chlorine through baths and showers than drinking. One of the mechanisms for this is gaseous chlorine in steam gets inhaled and crosses the lung barrier. There are several options available at health food stores – we’ve used both the Santevia and The Original Bath Ball.

TOP PRIORITY: this is a tough one, I’d say both. But from a financial perspective, I’d do what we did – shower filter + basic water filter to start.

4. Food

First and foremost, stop eating man-made, fake foods. It is a good idea to always avoid the following:

  • Food dyes / artificial colours (That means sprinkles, candy and common beverages like gatorade. There are dye-free options at health foods stores if you absolutely need it.)
  • Artificial sweeteners
  • Artificial flavours
  • Vegetable oils

After that, we purchase organic whenever we can. Not because organic foods contain more nutrients (although many do), but because of what they don’t contain – pesticides, herbicides, fungicides, hormones, antibiotics and genetically modified DNA. The order in which we prioritize that is as follows:

  1. Meat. This gets the top priority since it concentrates toxins up the food chain. Purchasing quality meat impacts your health, the health of the animals and the health of the environment. This includes animal-fats like lard, tallow, bacon-grease, duck fat etc. The fattier the meat, the more important, since toxins are stored in animal fat.
  2. Dairy. We don’t eat dairy (both have serious allergies), but if we did, it would absolutely be grass-fed or organic for the same reasons as above. This includes butter/ghee.
  3. Dirty Dozen vegetables & fruit. The reason this isn’t at the top, is if our budget is a little tight, we don’t buy these guys. We’ll stick to the veggies on the Clean Fifteen and buy them conventional.
  4. Other produce. If the price isn’t too much different, I”ll buy the organic version of the Clean Fifteen – because it is better for us and the environment. However, if it has been flown across the continent/world, I won’t.

Other foods to consider buying organic include:

  • Corn. If it’s not organic, it has been genetically modified to secrete it’s own pesticide that damages the intestines of the pests that eat it, which kills them. (sound familiar?)
  • Soy. If it’s not organic, it has been genetically modified to withstand ridiculously high levels of RoundUp, so everything around it dies, but the soy doesn’t – it just gets covered in it and then we eat it! Keep in mind that RoundUp used to be used on lawns (remember the commercials??) and is now banned in areas like Toronto, because it is so toxic.

TOP PRIORITY: fake foods, followed by fatty cuts of meat.

5. Plastics

Even BPA-free plastics. Plastics are toxins. End of story. BPA-free plastics have just had a different plasticizer used, that doesn’t have the drama around it. Same stuff, different day. The most important ways to avoid plastic include:

  1. Temperature. Never heat food in plastic! Even for a few seconds! Don’t put hot food in a plastic container either. This includes leaving your water bottle in the car in the sun.
  2. Acid. Highly acidic foods break down the plastic, which then leaches into your food. Tomatoes and citrus are the most common culprits.
  3. Fat. Foods that are high in fat/oil also leach plastic out of the solid state. So whenever possible buy oils and nut-butters in glass.
  4. Water. With the amount of water we need to drink, our exposure to plastic sky rockets. Recyclable water bottles start to degrade as soon as you open them, so definitely don’t reuse those. But even standard water bottles break down over time. Choose stainless steel or glass instead.

Dry foods are not nearly as much of a concern. So storing things like baking ingredients, grains (if tolerated) and spices in plastic isn’t something to worry about! For kids dishes – silicone is great option! Keep an eye on places like Canadian Tire, which often have sales on glass tupperware. Also start reusing jars instead of recycling! I wash salsa and nut butter jars, and reuse them for freezing food, DIY mayo and broth!

TOP PRIORITY: heating food in plastic.

SUMMARY

Reducing your overall exposure to toxins is a process – trust me, I know! It probably took me a good 2 years to fully clear out my house of toxins. You don’t need to change everything all at once (unless that’s your personality type). Just making 1 or 2 small changes can have a huge impact. Do some research. Determine your priorities. Consider speeding up the process a bit if you are / plan to be pregnant or have little ones at home, but don’t stress! To help prevent stressing, at the end of each section above, I highlighted the top priority, to help you start your detoxing journey. Enjoy the process and learn as you go!

Please share in the comments below, what your favourite clean products are and where you find them!

Copyright 2014 Amanda Naturally | Design by The Nectar Collective