Homemade Dusting Spray

Homemade Dusting Spray - Amanda NaturallyOne of the first cleaning tasks I was trusted with as a kid was dusting the dining room. The chairs were a bit of a nuisance with all the spokes I had to get around, but I absolutely loved dusting the piano. I know it sounds crazy, but there I was, rag and Endust in hand, taking care of that beautiful instrument. I think it was probably the immediate gratification of how shiny the wood got as soon as I ran the rag over it…

Annnnywayys, enough reminiscing. After I started getting into nutrition, and really being concerned with the quality of food I was putting in my body, not to mention avoiding putting toxins in my body, it was a natural progression to start critically looking at the products I used to clean my house. One quick search on Google directed me to what is now one of my favourite websites: Environmental Working Group. One of the many things they do is use peer-reviewed, scientific studies to assess products and tell you exactly what they think – and boy are they harsh!

I immediately threw out everything I had. I usually recommend slowly transitioning products over, but when it comes to cleaning products, just get rid of ’em. They’re not that expensive and holy bejeezus they’re full of toxins. I started buying “environmentally-friendly” products – you know, the ones labelled “green”, “natural” or “chemical-free” (none of these labels have any legislated protection by the way). The only problem was they still had a bazillion ingredients (some of which looked a bit sketchy to me) and they were expensive. I started to look for other solutions…little did I know, everything I needed was already in my house!

I began making my own cleaning products to decrease my toxin exposure about 3 years ago, and haven’t looked back. Why? Well not only are they incredibly effective, but they’re so inexpensive!! I try to buy my individual ingredients in bulk, but even in small sizes you absolutely beat the price any commercial product, green-washed or not! My top 2 ingredients for homemade cleaning products are:

1. Vinegar
2. Baking Soda

Followed very closely by:

3. Borax
4. Castille or Glycerin Soap
5. Essential Oils (top 2: Tea Tree and anything Citrus)

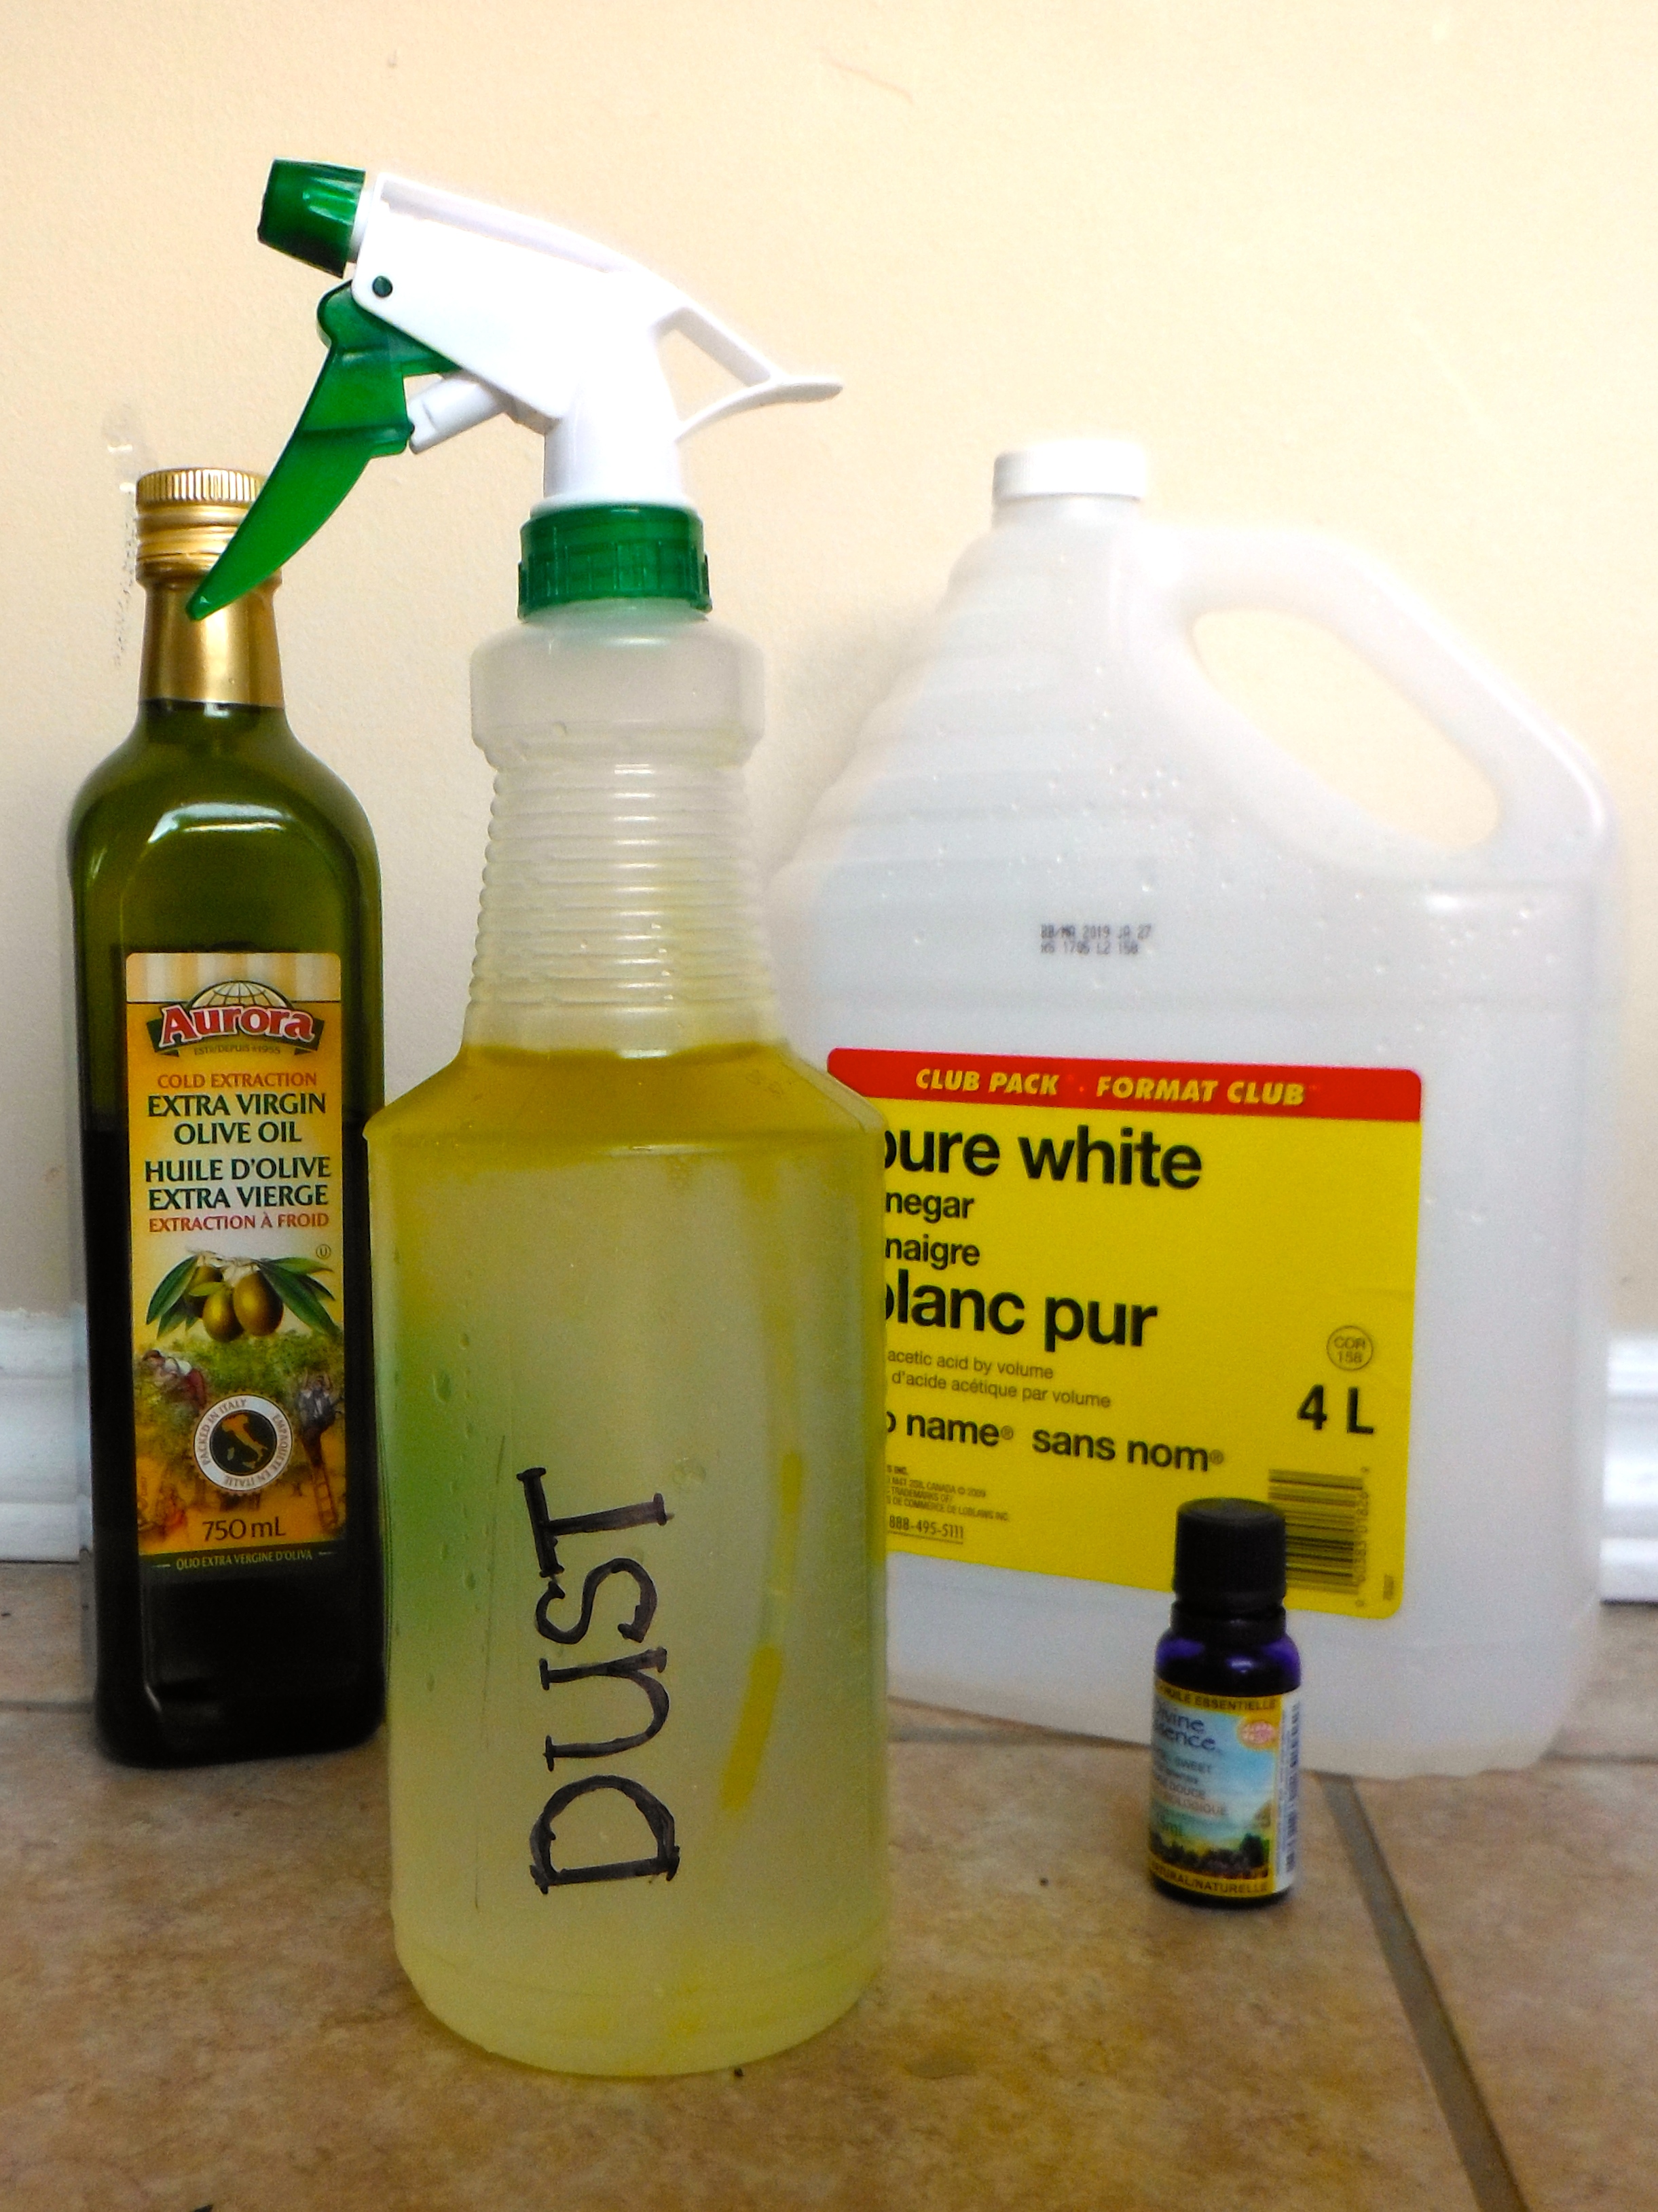
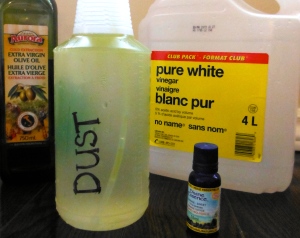
You can pretty much clean any room in the house with these ingredients, but it was a replacement for dusting that got me a-googling again. I know I can use a special cloth, but I honestly like to use plain old rags, and my kitchen/bathroom cleaner wasn’t cutting it, so a dusting spray was key. It stumbled across the idea of using olive oil in your dusting spray, over at One Good Thing By Jillee. Well that was just genius! I pretty much added a few tsp of olive oil to my standard cleaner and voila, a perfect dusting spray.

Homemade Dusting Spray (Natural & Toxin-Free)

1 part vinegar
4 parts water (purified or filtered to prevent build up of minerals)
citrus essential oil (optional, but makes everything smell nice. If including, use enough to mostly cover the scent of the vinegar)
a few tsp of of olive oil

Combine all ingredients in a spray bottle, shake well and dust away!

My spray bottle is about 1L in size, and I usually eye-ball the measurements. It typically goes something like this:

1/5 vinegar
30 drops of sweet orange essential oil
2 dollops olive oil (approx. 2 tbsp)
fill the rest with filtered water

Special Considerations:

1. Since no emulsifiers are used, the oil will sit on the top of the water, simply shake it every time you use it.

2. Essential oils are absolutely not necessary, but they are totally worth the investment! A small bottle of Sweet Orange essential oil is less than $10.00 and will last you a long time. 

Homemade Dusting Spray - Amanda Naturally

Have you started to make any of your own cleaning products? If yes, what was your incentive – health, environment or financial?

No Bake Pumpkin Pie

No Bake Pumpkin Pie - paleo, vegan, nut free - Amanda Naturally

I love pumpkin pie. Like love love love it. It’s one of my favourite parts of Thanksgiving – that and the amazing quality time with family of course! Unfortunately inherent to a traditional pumpkin pie recipe is wheat and dairy, so it’s non-negotiable for me. It’s been years since I’ve had a bite of that sweet and spicy goodness and oh how I missed it! This year it all changed. But first, let me preface this post with an important fact:

I am NOT a baker.

I can do muffins and cookies, but if they are too complicated I’ll even mess those up!

In complete defiance of my lack of baking and general desert-making skills, I decided to take on the challenge. I took a look at a pumpkin pie and realized that the filling is pretty darn simple. All I needed was pureed pumpkin, pumpkin pie spice, something to sweeten it with (maple syrup, obv) and something to help it thicken and keep its consistency. I wanted it to be egg-free (that gets complicated and involves baking or making peaks somehow) and vegan (no gelatin)…coconut oil would melt too quickly after you pulled it out of the fridge…hmmm…and then it hit me, coconut butter! My favourite snack ever! What would happen if I mixed pumpkin and coconut butter together…well it was a match made in heaven!

As for the crust, well I’ve never been one for pastry, so I considered omitting it altogether, but realized it would be a little challenging to serve up. So I figured a typical nut/date no-bake crust would go well. Except I decided to try a nut-free version using pumpkin seeds so it would be safe for schools, and it worked amazingly! Not to mention, toasted pumpkin seeds totally go with the vibe of the season! 

No Bake Pumpkin Pie - paleo, vegan, nut free - Amanda Naturally

The resulting no bake pumpkin pie was a HUGE hit. I tried it out on my husband immediately, and my colleagues at work the next day, and I think it’s safe to say that I will absolutely be bringing this to my family Thanksgiving dinner on Sunday. (FYI I’m in Canada!) Not only is this delicious and pretty darn healthy, it is also:

No bake.

Sugar-free.

Nut-free.

Dairy-free.

Gluten-free.

Grain-free.

Paleo.

Vegan.

Yeah, you read that right! It pretty much fits every single dietary requirement I ever get asked for! Heck, I feel like you could even make it autoimmune compliant by substituting shredded coconut for the seeds in the crust and cutting back on some maple syrup. I haven’t tried that though, so if you do, please let me know in the comments below!

No Bake Pumpkin Pie - vegan, paleo nut-free - Amanda Naturally

Bonus: you can make it ahead and it keeps really well in the fridge!

No Bake Pumpkin Pie
An simple yet yummy take on the traditional pumpkin pie. Nut-free, dairy-free, gluten-free, grain-free, dairy-free and sugar-free. Vegan and paleo!
Write a review
Print
Prep Time
25 min
Total Time
25 min
Prep Time
25 min
Total Time
25 min
Crust
  1. 3 cups dates
  2. 1½ cups pumpkin seeds, toasted
  3. 2 tbsp coconut oil
  4. pinch of sea salt
Filling
  1. 1¾ cups coconut butter (homemade or store bought)
  2. 3 cups pumpkin puree (homemade or canned)
  3. ½ cup pure maple syrup
  4. ½ tsp sea salt
  5. 2½ tbsp pumpkin pie spice
  6. ¼ cup coconut oil
  7. 2 tsp vanilla extract
Instructions
  1. In a food processor, combine all the crust ingredients. Blend until it starts to stick together and to the sides. You may need to scrape the sides down once or twice with a spatula. This step takes about 2 minutes of processing.
  2. Line a springform pan with parchment paper.
  3. Pour the crust into the pan. Pack it down tightly using your fingers.
  4. Rinse the food processor.
  5. Gently warm your coconut butter either in the microwave, the oven or in a water bath.
  6. Combine all filling ingredients in the food processor. Blend until smooth.
  7. Pour onto the crust and smooth down with a spatula.
  8. Chill in the fridge for a minimum of 1 hour.
  9. Run a knife along the sides and remove from the pan.
  10. Enjoy with some coconut milk ice cream, or homemade whipped cream!
Notes
  1. This pie is really dense and large. I made it to feed 16 people!
  2. You can absolutely make a smaller size.
  3. It also works well as bars / squares.
Amanda Naturally http://www.amandanaturally.com/
 No Bake Pumpkin Pie - paleo, vegan, nut free - Amanda Naturally

Wishing all my Canadians a Happy Thanksgiving weekend with lots of love, light and laughter. Here’s to having so much to be thankful for! xo

Sausage Stuffed Delicata Squash

Sausage Stuffed Delicata Squash - Amanda NaturallySquash is by far my favourite of the fall foods! As soon as the weather cools down a bit in September I throw the first
squash I can get my hands on into the oven and roast it until it starts to caramelize. It is so sweet and delicious, while being a fairly low concentration of carbs, so you don’t get whacked with a massive blood sugar spike. The ironic thing is when I was a kid I hated squash. It would literally make me gag, so I would mix ½ tsp in with a huge spoonful of mashed potatoes so I could taste it less..but then it would ruin my mashed potatoes. Siiggh, 8-year old problems. My brother and I would even fight about who had to carry it to the table, we hated it so.

That all changed when I was in grade 12. I randomly ended up at a sort of friend / acquaintance’s house for dinner one night and her mom served us a quarter of an acorn squash with a pat of butter and some brown sugar. I almost died when I saw it, but I sucked it up and ate it because I didn’t want to be rude. I was shocked to find out it was delicious and I’ve never looked back. Thank you social pressure! My brother still calls me a traitor…

Sausage Stuffed Delicata Squash - Amanda Naturally

My favourite of all the squash is the Delicata. These guys only seem to be out for a short while in the fall, so I scoop them up where ever I find them! I love them for a few reasons:

  1. small in size, so they cook faster
  2. thin diameter and thin skin, so they are less risky to cut open
  3. you can eat the skin!

Speaking of the risk associated with trying to hack open a raw squash. A few years back I was googling around trying to find an easier way to cut squash, because I was sure I’d lose a finger one day. I stumbled across the most incredible trick that I have used on every squash I’ve cooked since!

Wash the skin of entire squash well. Throw it directly into the oven while it is preheating to the eventual temperature you are going to roast it at. Depending on the size of the squash, leave it in there for 15-25 minutes.

Sausage Stuffed Delicata Squash - Amanda Naturally

At about the 20 minute mark, pull the squash slice it open and scoop out the seeds. You likely will want to wear oven mitts because baked squash retain their heat forever!

I have done this with acorn, delicata, buttercup, butternut, spaghetti…. it has never exploded because it’s not in there long enough, and I am much more confident in making it to my 30’s with all of my fingers!

Ok back to my favourite squash….today I bring you Sausage Stuffed Delicata Squash!

I was inspired by a traditional recipe for stuffed peppers, which typically uses rice and ground beef. I used cauli-rice (anyone who hasn’t tried it, do it! It’s delicious!) and farmer’s garlic sausage from our meat delivery guys because it was already spiced a bit, which made my job a whole lot easier! The recipe may look long and involved, but I promise you it is very easy. The only tricky part is there are multiple parts going at the same time. The good news is, it’s really hard to mess up any one part. So while the recipe may indicate that something needs to be cooked for 5 minutes, anywhere from 5-10 is okay! Just keep the heat below medium to prevent burning, and you can take it at your own pace. 

PS. These guys would be amazing stuffed in mini pumpkins for Thanksgiving…just sayin’!

Sausage Stuffed Delicata Squash - Amanda Naturally

Sausage Stuffed Delicata Squash
Serves 6
A delicious and nutritious meal, inspired by local fall flavours.
Write a review
Print
Prep Time
10 min
Cook Time
50 min
Total Time
1 hr
Prep Time
10 min
Cook Time
50 min
Total Time
1 hr
Squash
  1. 4-5 delicata squash
Sausage
  1. 2 tbsp fat of choice (duck fat, lard, tallow, coconut oil)
  2. 2 onions, diced
  3. 1 large bell pepper, diced
  4. 3-4 cloves garlic, minced
  5. 4 pastured sausages
  6. 1 bunch kale, washed and chopped into bite sized pieces
  7. sea salt
  8. pepper
Cauli-Rice
  1. 1 head cauliflower
  2. 2 tbsp fat
  3. sea salt
  4. pepper
Optional
  1. nutritional yeast
Squash
  1. Place whole squash in oven. Preheat oven to 400F. Leave squash in oven for 25 minutes (including preheating time).
  2. Remove squash from oven. Cut in half length wise and scoop out seeds.
  3. Place cut side down on a baking sheet and bake for another 15-20 minutes.
  4. When the squash gives under pressure, it is done. Remove from oven.
Sausage
  1. While squash is in the oven, prep all veggies. Dice onions and peppers. Mince garlic. Wash and chop kale.
  2. Heat 2 tbsp fat over medium heat. Add onion and pepper. Season with sea salt and pepper. Sautee for 7-8 minutes.
  3. Add garlic. Cook for 2 minutes.
  4. Take sausage out of casings and add to pan. Season again with sea salt and pepper. Stir occasionally, until cooked through, approximately 5 minutes.
  5. When sausage has cooked through, add kale. Stir to combine and cook for another 5 minutes.
  6. Add to cooked Cauli-Rice (see below) and stir to combine.
Cauli-Rice
  1. When sausage is cooking. Wash a head of cauliflower and chop into pieces.
  2. Using the shredder attachment on a food processor, shred cauliflower into rice-sized pieces.
  3. Heat 2 tbsp fat of choice in a large pan, over medium heat.
  4. Add shredded cauliflower and season very liberally with sea salt and pepper.
  5. Stir to combine, cover with a lid and let cook for at least 10 minutes. Stir occasionally.
Final Product
  1. Turn the oven to broil.
  2. Flip the squash so it is skin side down.
  3. Fill the squash with the sausage and cauli-rice mixture, really packing it down. Top with more mixture.
  4. Sprinkle some nutritional yeast on top and broil for 3-5 minutes, being careful not to burn!
  5. Serve immediately.
Notes
  1. Most of this recipe can be made up to 24 hours in advance. Roast the squash and store in a sealed container in the fridge. Prepare the filling and store in a sealed container in the fridge. Assemble when you are ready to eat. Instead of broiling, heat the oven to 400F and cook for 15 minutes until heated through.
This recipe is very flexible
  1. - add or remove any vegetables you have on hand (eg. omit bell pepper if following a therapeutic diet)
  2. - substitute other ground meat or shredded chicken
  3. - substitute acorn, butternut or kabocha squash or even small or mini pumpkins
Amanda Naturally http://www.amandanaturally.com/

Preheat oven to 400F. Gather ingredients. Wash squash and throw in the oven as it’s preheating. Prep veggies. Gather spices. Take the sausage out of the casings.

Sausage Stuffed Delicata Squash - Amanda Naturally  Sausage Stuffed Delicata Squash - Amanda Naturally Sausage Stuffed Delicata Squash - Amanda Naturally


Sautee onions and peppers until translucent. Add garlic, cook for a few minutes. Add sausage. Cook through. When the meat is cooked, stir in the chopped kale and cook for another 5 minutes. 

Sausage Stuffed Delicata Squash - Amanda Naturally  Sausage Stuffed Delicata Squash - Amanda Naturally

Meanwhile, shred cauliflower and sautee in a covered pan with lots of salt and pepper. Cook for a minimum of 10 minutes, stirring occasionally.

Sausage Stuffed Delicata Squash - Amanda Naturally  Sausage Stuffed Delicata Squash - Amanda Naturally Sausage Stuffed Delicata Squash - Amanda Naturally  Sausage Stuffed Delicata Squash - Amanda Naturally

Once the squash has been in the oven for 20-25 minutes or so, take it out, cut in half lengthwise and scoop out the seeds. Place on a tray, cut side down and roast for another 20 minutes.

Sausage Stuffed Delicata Squash - Amanda Naturally

When both the sausage mixture and the cauli-rice are done, add together in the larger pan. In my case it was the cauli-rice pan. Stir to combine. It can sit at this stage until you are ready to assemble.

Sausage Stuffed Delicata Squash - Amanda Naturally

Pull the squash out of the oven and flip onto the round side. Turn the oven to broil. Stuff with cauli-rice/sausage mixture, packing down and adding more on top. Sprinkle with nutritional yeast and broil for 3-5 minutes, being careful not to burn. Enjoy every mouth-watering bite!!

Sausage Stuffed Delicata Squash - Amanda Naturally  Sausage Stuffed Delicata Squash - Amanda Naturally

So tell me, what’s your favourite fall vegetable??

Copyright 2014 Amanda Naturally | Design by The Nectar Collective